bauder
Bauder roofing completed.
Over the course of the last week or so the team from Greenroof UK have been working on installing our Bauder felt roof covering, and all of the flat roof insulation. As the roof is virtually flat (1 degree fall) it was important to us to use a tried and tested system with a reliable guarantee, which is why we selected the Bauder green roof system. All installers are Bauder approved, which means that they have undertaken training using their specific products, and as well as approving our details to make sure that they are fully compliant for the guarantee, Bauder Site Technicians come regularly to site and inspect the works.
The multiple layers that make up the roof construction all have a specific function and are all at the top end of the market in terms of performance specification. Although the roof covering does not influence the airtightness of the building as the airtight layer at the roof is internal, we wanted to use a system that would allow us to form a reliable wind-tight seal to our external insulation, which is also our wind-tight layer. Wind-tightness on the outside of the construction also makes an important contribution to the overall heat loss and actual performance of the building.
Although ideally we had wanted to avoid the use of PIR insulation within the building fabric if possible, we quickly realised that the design of a flat roof with a sedum covering to 'give back' some greenery and natural habitat in place of the building footprint necessitated a fully water-proof insulation product. Some form of compromise is always necessary!


All of the Bauder products arrived on an almost full lorry load and then were lifted to roof level...
The first part in the process was the installation of the torch applied Vapour Control Layer. This is a 3.5mm thick, elastomeric, bitumen based, heat activated vapour barrier. This membrane will not allow either water or vapour to pass through it in either direction, which effectively means that the roof does not form part of our 'breathing' construction. Each roll overlaps the previous one by a minimum of 100mm and the joints are fully bonded with a 5-10mm bitumen bead visible on completion, which helps to visually confirm that the laps have been done properly.

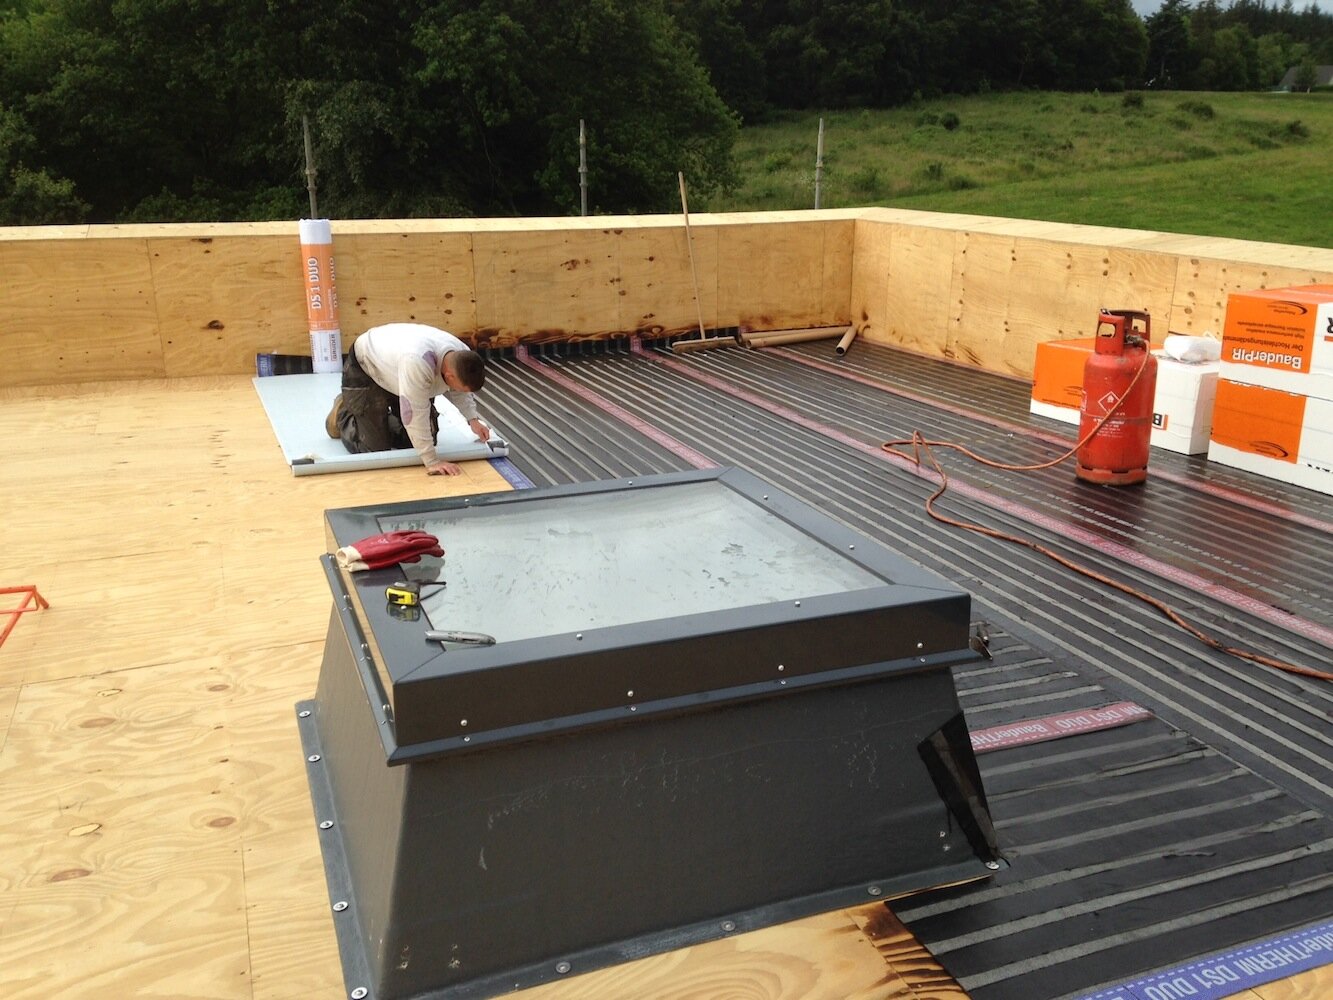

The overlaps are made in both directions… The third photo shows some loose off-cuts laying on top to protect the VCL below.
This layer is fully wrapped up and over the parapet coping to protect the wall construction below; it is also lapped up the sides of the rooflight GRP upstands and bonded to them to create a water-tight seal.


Richard, our allocated Site Technician, takes photographs and records the progress so that he can produce a log of the work and any comments, which he then issues to all parties. The insulation was stacked on the roof waiting to be installed.


The insulation is laid in two layers due to it's thickness: a first layer of 140mm thick, followed by a second 120mm thick. As we need to achieve 0.09W/m2K for the roof U-Value we need a reasonable amount of the PIR insulation. The two boards are slightly different due to their positions in the construction, so their lambda values vary: the bottom thicker board is 0.022W/mK and the upper thinner board is 0.025W/mK. (For comparison, the flexible wood fibre batts we are using in the wall construction have a lamda value of 0.038W/mK and the external Gutex insulation board is 0.039W/mK, so you can see why there is less of an insulation thickness overall in the roof to achieve a better U-Value.)
The roof insulation also extends up and over the parapet coping in a thickness of 100mm to eliminate cold bridging here, and to ensure thermal continuity with the external wall insulation. As you can see it also overlaps the pre-insulated upstands of the rooflights, creating a thermal bridge free junction around them.


Next the Bauder underlayer is installed. Again this is a heat-activated self-adhesive membrane, which gets torched to the upper insulation board, and again extends up around the rooflights and up and over the parapet coping. This layer is also 3mm thick, and is glass-reinforced. Again, the rolls are overlapped and the joins fully bonded to form a water-proof layer over the whole of the roof and parapet.
Insulation fillets were installed around the roof perimeter and rooflight upstands to facilitate water run-off at these potentially vulnerable junctions. The underlayer is then installed over these fillets.


The various layers at the outer face of the parapet coping showing the overlap of the VCL and the underlayer.
These next images show the completed underlayer and the parapet outlet with leaf guard in the south east corner of the roof.


The next and final stage in the waterproofing of the roof was the installation of the capping sheet. This layer is a 5 mm thick, 250g/m² polyester reinforced, elastomeric bitumen, root resistant, torch applied capping sheet. This layer is green in colour and the black lines are the bitumen bead, which again is good visual confirmation that the overlaps have been properly sealed.
The perimeter and upstands are finished in a similar flashing sheet, but in grey as they will remain visible when on the roof. We are now ready for the sedum roof covering, although we will probably be leaving that until later this summer due to the scheduling of the other works that it would be better to do at this stage to further advance the shell towards full weather protection!


